
You can manage our web hosting plans using the KeyHelp control panel. This is an interface accessible via a web browser, where you can access your domains, email accounts, databases and website files all in one place. This article outlines what you should set up first on a new hosting account.
Log in to the control panel
Once your web hosting service is set up, we will email you your login details. You can access the control panel via the ‘Services’ page on the client portal, or via the link provided in your welcome email.
The client portal and KeyHelp are two separate interfaces, each with its own login details. In the client portal, you manage your subscriptions, invoices and tickets, while in KeyHelp you manage the hosting itself. Email accounts and WordPress passwords are independent of these.
The home page and the menu
Once logged in, on the Dashboard page you will see the key details of your plan: how much storage your website, emails and databases are using, and how many domains, email addresses, databases and FTP users you have left before reaching the plan limit. You will also find the server’s IP address and the system username here.
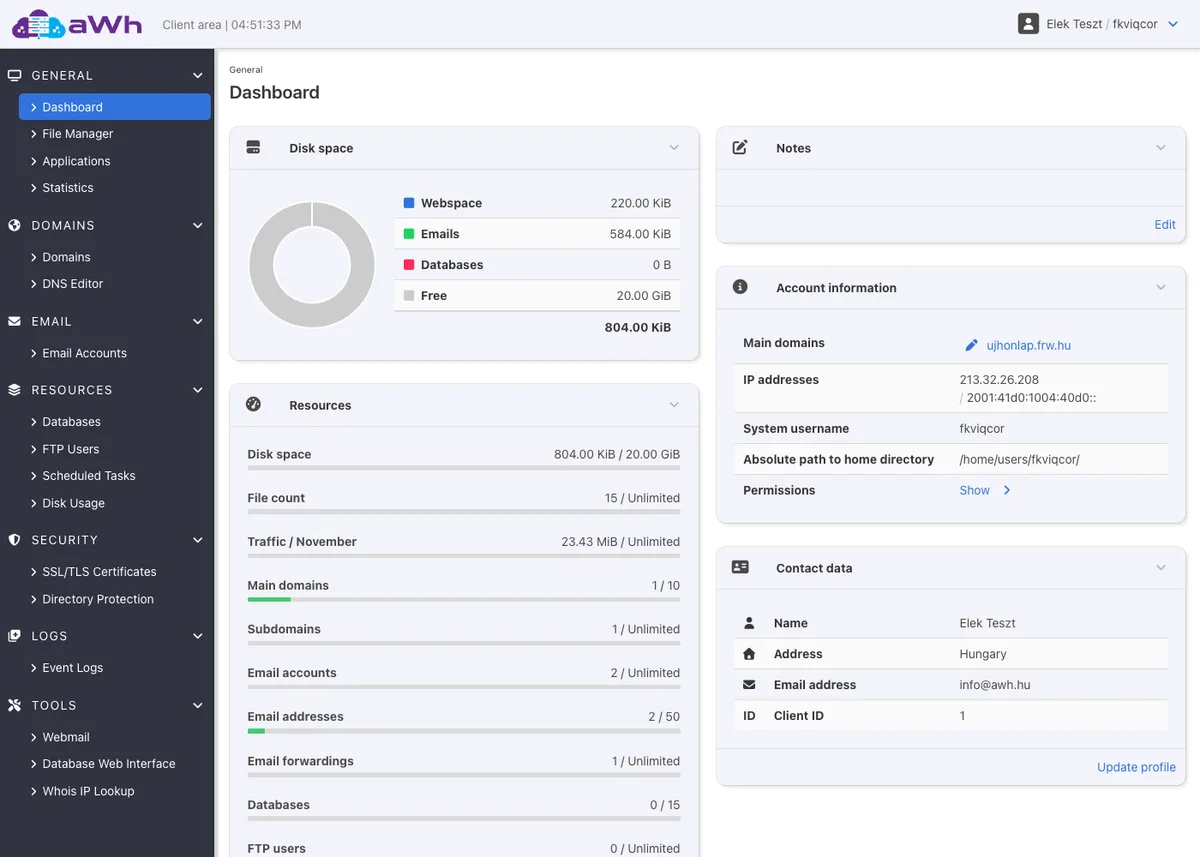
You can reach the features from the left-hand menu, organised into groups: General (Dashboard, File Manager, Applications, Statistics), Domains (Domains, DNS Editor), Email (Email Accounts), Resources (Databases, FTP Users, Scheduled Tasks, Disk Usage), Security (SSL/TLS Certificates, Directory Protection), Logs (Event Logs) and Tools (Webmail, Database Web Interface, Whois IP Lookup). You can change the interface language by clicking your name in the top right-hand corner, on the Profile Settings page.
Adding a domain and subdomain
You can add domains via the Domains menu item by clicking the Add domain button. Here, you can choose whether to create a main domain or a subdomain (for example, blog.cegnev.hu), request a separate www. subdomain, and enable the Let’s Encrypt certificate and HTTPS redirection at the time of creation. The number of main domains you can add depends on your plan, while you can create an unlimited number of subdomains.
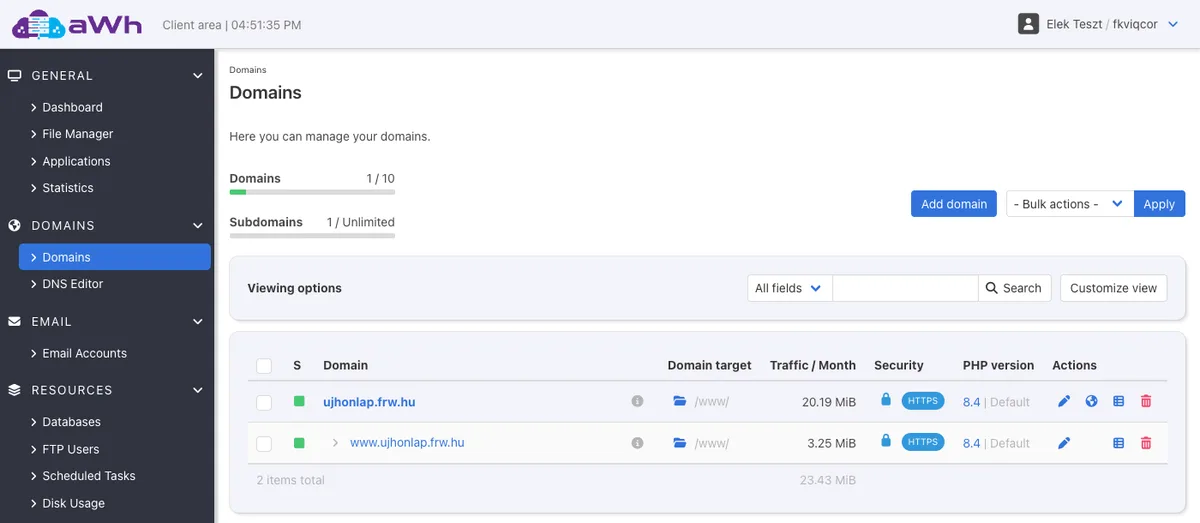
In the list, you can see which folder the domain points to (by default, the /www/ folder), whether HTTPS is enabled, and which version of PHP is running on it. Using the icons at the end of each row, you can edit the domain (pencil), manage its DNS settings, view its logs or delete it.
For the website to load from the hosting account, the domain must point to the hosting account. To do this by modifying the A record or changing the nameservers, refer to the article comparing the two methods of domain management. If the domain uses the hosting provider’s name servers, you can amend the records yourself via the DNS editor menu item; our article on editing DNS records on a web hosting account explains how to do this. It may take a few hours for the changes to take effect; the reason for this is explained in our article on DNS propagation.
Deleting a domain or subdomain
If you no longer need a domain or subdomain on your hosting account, you can delete it from the Domains list:
- In the menu on the left, open the ‘Domains’ menu item.
- At the end of the domain row, click on the red bin icon (Delete).
- On the ‘Delete Domain’ page, check that you have selected the correct domain and see how many email accounts and subdomains are associated with it.
- Tick the ‘Confirm’ tick box, then click the ‘Delete’ button.
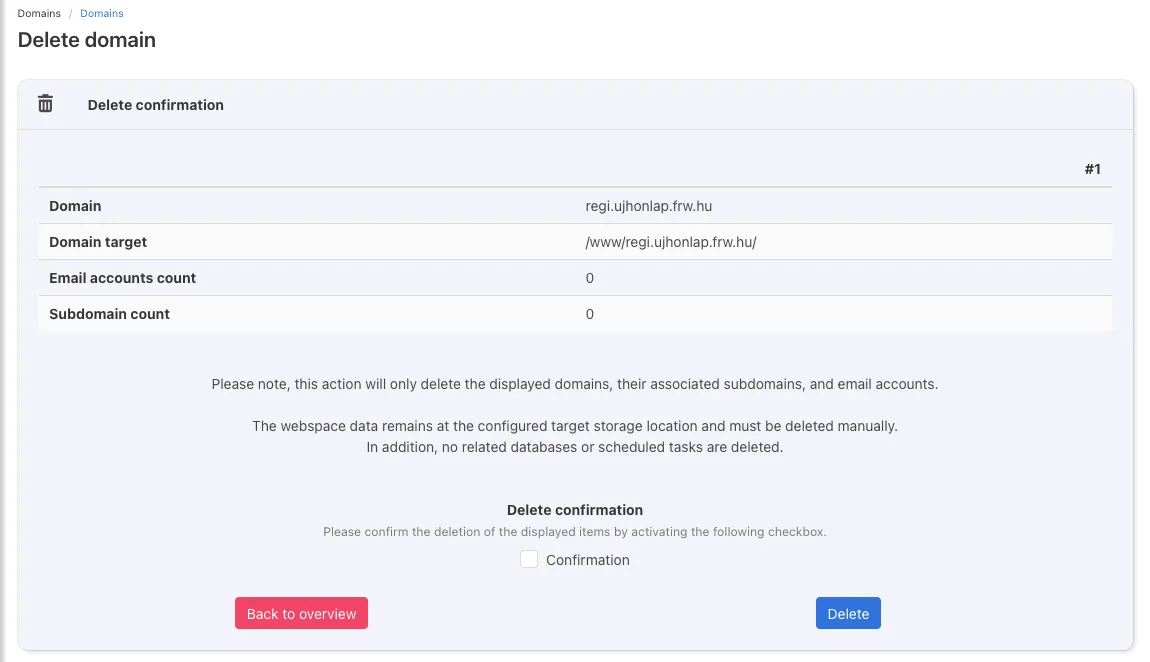
You can delete several domains at once: select them at the top of the list, choose Delete selection from the Bulk actions list, and click the Apply button.
Deleting the main domain will also delete its associated subdomains and email accounts, so if you still need your emails, save them first. However, the website files will remain in the domain folder, and the associated databases and scheduled tasks will not be deleted. You can delete these separately: select the folder in the File Manager, choose Delete selection from the Bulk actions list, click Apply, then Yes; you can delete the database under Databases and the scheduled task under Scheduled Tasks. Only delete a folder if it is not being used by another domain: by default, the main domain and the www subdomain both point to the same /www/ folder.
Deleting a domain from your hosting account does not cancel the domain registration. If you registered the domain with us and no longer need it, you can cancel its renewal via the client portal; the steps are described in the article on cancelling services.
Free SSL certificate
You can enable the Let’s Encrypt certificate on a per-domain basis: in the Domains list, click the pencil icon next to the domain, then select the Let’s Encrypt certificate option on the Security tab, and tick the ‘Enabled’ option under ‘Enforce secure connection’. If the domain is already pointing to your web hosting account, the certificate is usually issued within a few minutes and is automatically renewed by the system. The steps are illustrated with images in the article on enabling Let’s Encrypt certificates on your web hosting account.
Creating email accounts
In the Email Accounts menu item, you can create a mailbox for the domains you have added with the Add email account button: enter the address, a strong password and the size of the mailbox. You can also set up alternative addresses (aliases) and forwarding here; the steps, with screenshots, are shown in the article on creating email accounts and forwarding. You can read your emails in the browser via the Webmail menu item, or set them up on your phone and in an email client: the articles on setting up iPhone and Android, Thunderbird and Outlook will help you with this.
Databases
In the Databases menu item, you can create a MySQL (MariaDB) database by clicking the Add database button. Here, enter the database name, username and password; make a note of these, as you will need them to configure your website (for example, in the WordPress wp-config.php file). You can view, export and import the contents of the databases in the web-based database manager, which opens from the Database Web Interface menu item in the Tools group. Our article on MariaDB provides further details about the database manager.
Uploading files: FTP and file manager
There are two ways to upload your website files:
- Using the File Manager: directly from your browser, without installing any software, via the File Manager menu item. In the Domains list, the folder icon next to a domain opens the File Manager directly in the domain’s root directory.
- Via FTP: using an FTP program, such as FileZilla, with an account created with the Add FTP user button in the FTP Users menu item. There is no SSH on web hosting, so use FTP instead of SFTP, preferably with an encrypted (TLS) connection.
Selecting a PHP version
You can set the PHP version per domain: in the Domains list, click the pencil icon, then on the Interpreter tab, select the version from the PHP interpreter list and save. If you would like the same version on the domain’s subdomains (for example, the www subdomain), tick the Apply PHP interpreter to all subdomains option as well. PHP versions 8.3, 8.4 and 8.5 are available on web hosting.
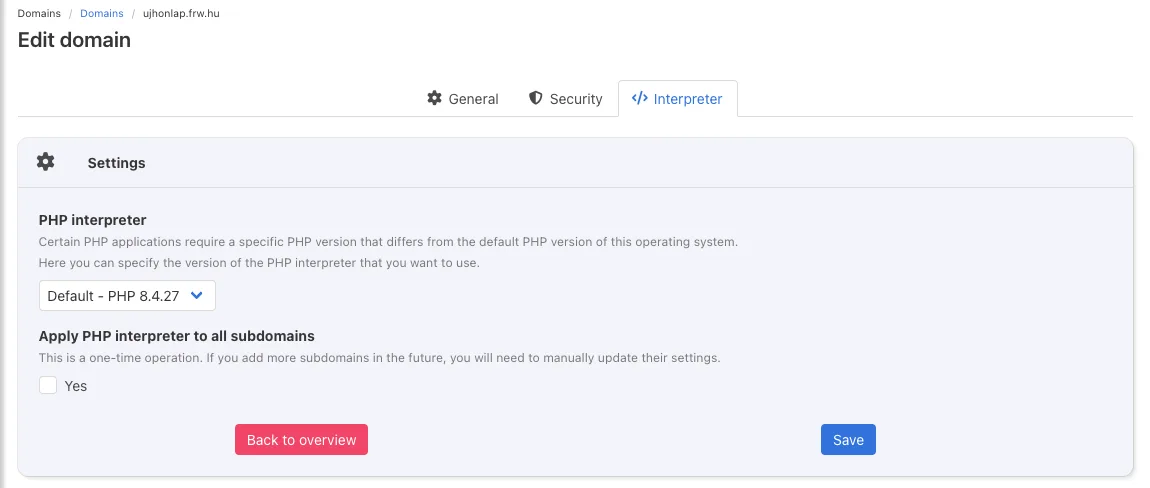
By clicking on the PHP version number in the list, you can view the domain’s current PHP settings (phpinfo). If you are unsure which version to choose, check the recommendations of your website’s content management system (e.g. WordPress) and select the latest version on which the site runs without errors. You can modify certain PHP parameters (memory limit, upload size) via the .user.ini file.
Installing WordPress and other applications
The web hosting service runs the KeyHelp Pro application installer, so you can install WordPress and other popular applications (such as Joomla, Drupal and Nextcloud) in just a few clicks.
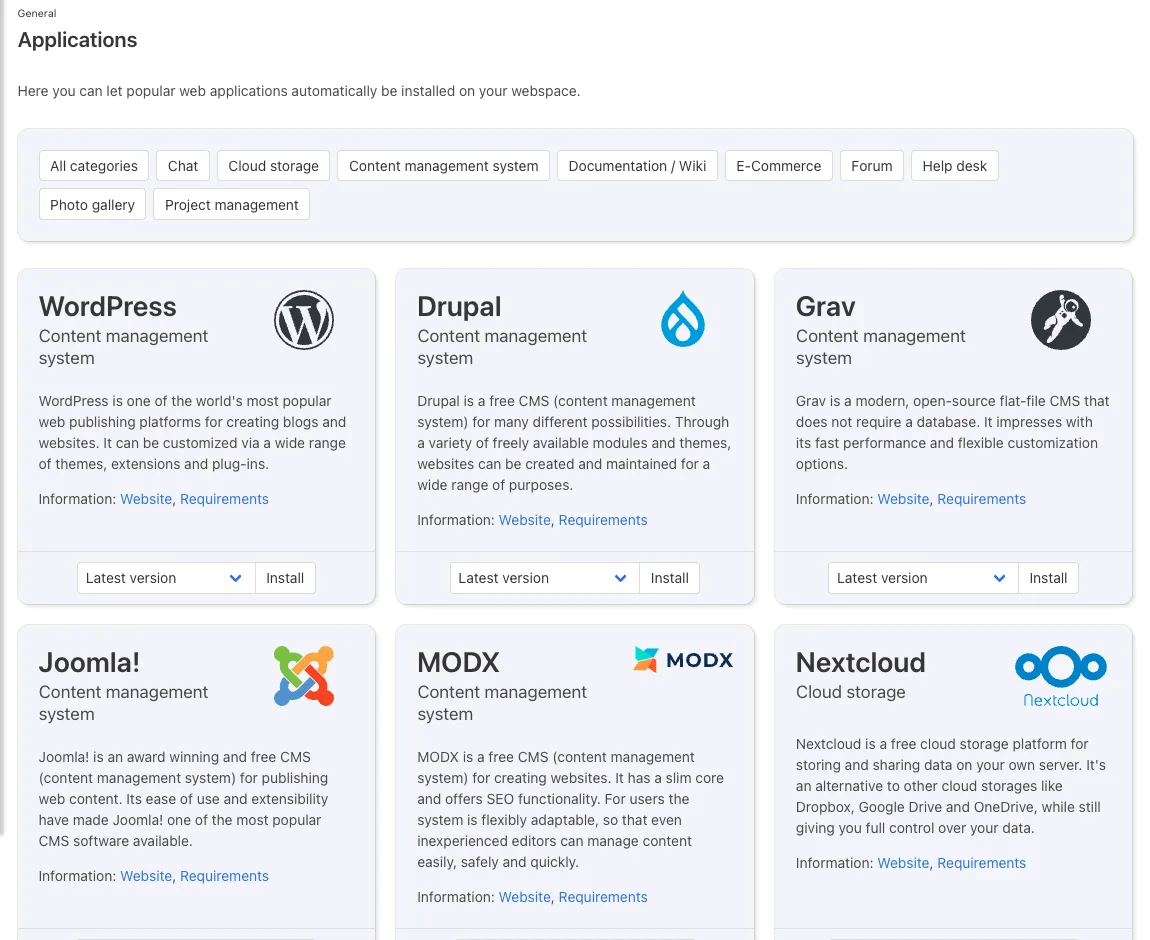
- In the menu on the left, open the ‘Applications’ menu item and click the ‘Install’ button in the box for the application (e.g. WordPress).
- In the Installation location section, select the domain. By default, the field suggests a
wordpress/subdirectory; if you want the site to be available directly on the domain (for examplecegnev.hu), clear this field. If the folder already contains files, decide under In case of existing files whether the installer should delete the entire contents of the folder (Delete entire directory contents) or only overwrite the conflicting files (Overwrite existing files). Protocol can stay on Automatic. - In the Administrator account section, enter your WordPress login username and email address. For security reasons, it is advisable to change the pre-filled “admin” username to something else, and enter your own email address here: this is where WordPress notifications and password reset emails will be sent.
- In the ‘Database’ section, the installer pre-fills the database name and username; the database is created automatically during installation.
- Click the ‘Install’ button. The password is generated by the system and can be found on the summary page after installation; please change it after your first login. You can access the WordPress control panel at
/wp-admin.
If you’re curious about what happens behind the scenes, or if you’d like to install WordPress with custom settings, we’ve also outlined the steps for manual installation. If you’d like a test environment and a dedicated WordPress management tool, our WordPress hosting comes with WP Toolkit.
Backup
From the Web Starter plan onwards, automatic backups are taken of websites and databases. You cannot manage these backups via the control panel; if you need to restore a file or database, please open a ticket. The free Web Free plan does not include backups; this and the plan’s other limitations are covered in the article on the limitations of the Web Free plan. Before making any major changes, it is advisable to create your own backup for all plans: export the database from the web-based database manager and download the files via File Manager or FTP.
Password and two-factor authentication
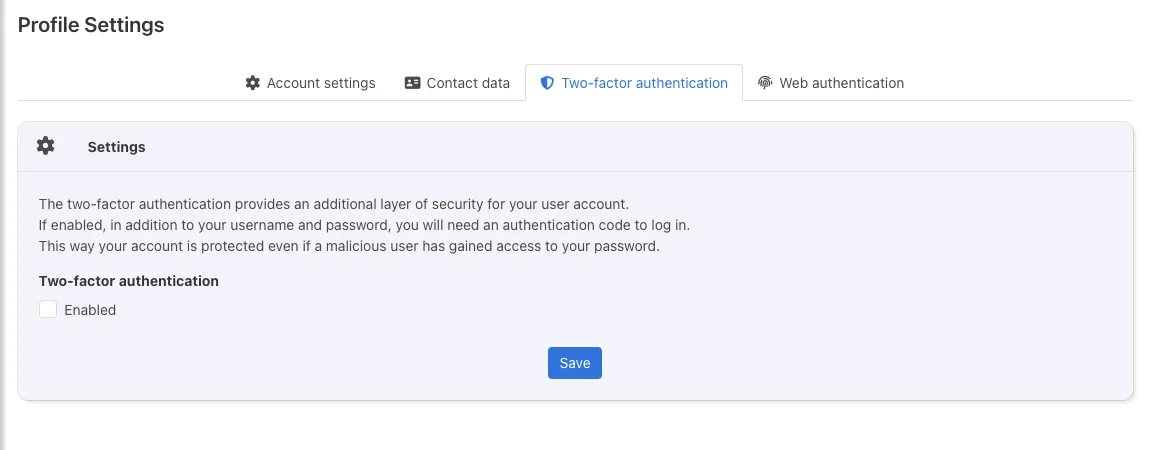
Click your name in the top right-hand corner to open the Profile Settings page. On the Account settings tab, you can change your password and the interface language, and enable an email notification for every login.
On the Two-factor authentication tab, you can enable two-step verification with an authenticator app (such as Google Authenticator or Microsoft Authenticator): you will then need to enter the code generated by the app as well as your password, so nobody can access the control panel even if your password leaks. On the Web authentication tab, you can log in with a FIDO2 security key or a passkey instead of a password.
If you need help
You can find further descriptions in the web hosting section of our knowledge base. If you get stuck, please write to us or open a ticket via the client portal. If your website is currently hosted by another provider, we will perform the migration free of charge.
