
With our web hosting plans, you can create your own email addresses for the domains you have added (for example, info@cegnev.hu), and set up forwarding so that emails sent to one address are also forwarded to another. You can do all this in the Email Accounts menu item of the KeyHelp control panel. A general overview of the control panel is given in the article summarising the first steps with KeyHelp. If you use cPanel hosting, creating a mailbox is explained in the guide to creating an email account in cPanel.
Before you begin
- The domain should be listed under the ‘Domains’ menu item.
- In order for emails to be delivered to the hosting account, the domain’s MX record must point to the hosting provider’s mail server. If the domain uses the hosting provider’s name servers, this is the case by default, and the zone also contains the SPF, DKIM and DMARC records (DNS editor).
- The number of email addresses you can create depends on the plan; at the top of the Dashboard and Email Accounts pages (Email accounts, Email addresses, Email forwardings) you can see how many of them you are using.
Creating a mailbox
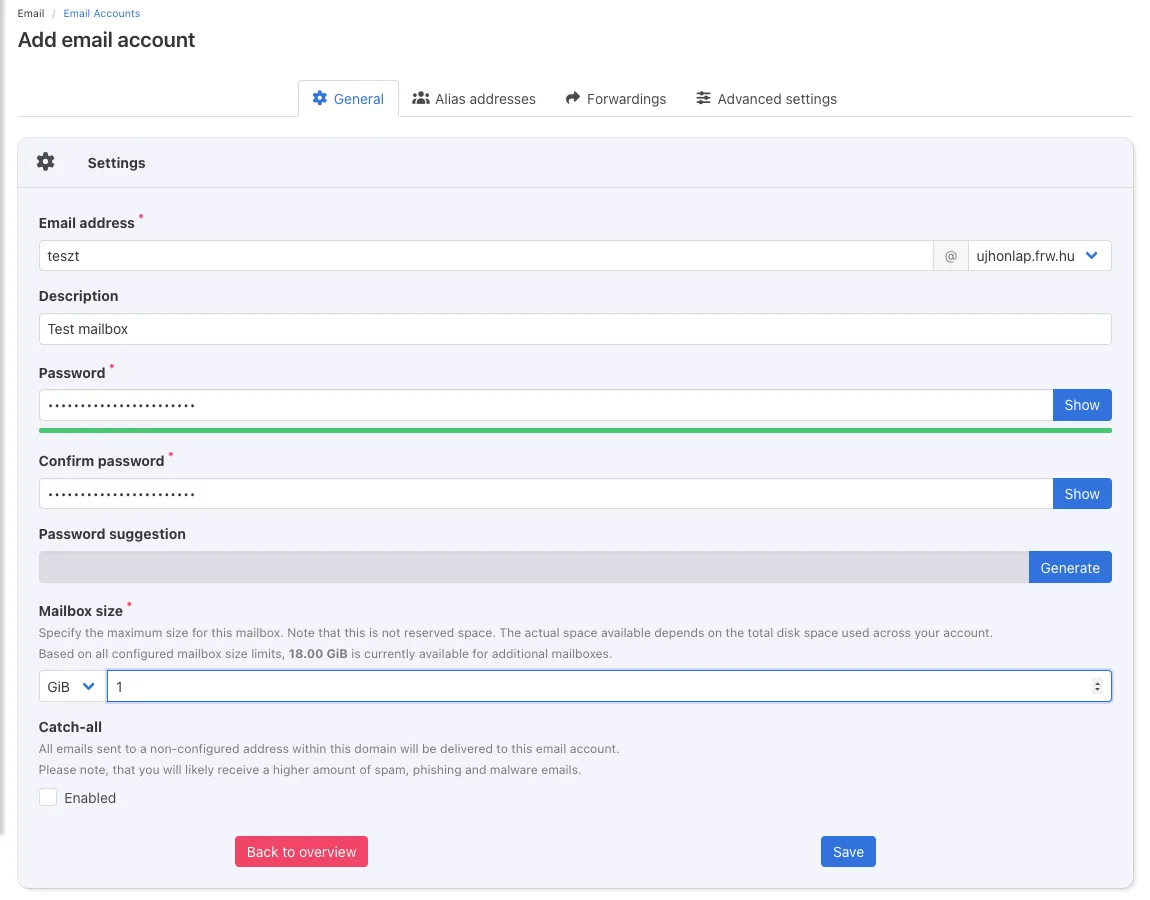
- In the left-hand menu, in the EMAIL group, open the Email Accounts menu item and click the Add email account button.
- On the ‘General’ tab, enter the part of the address that comes before the
@in the ‘Email address’ field, and select the domain from the list next to it. - You can enter a short comment (for example, a colleague’s name) in the Description field; this is only visible in the control panel.
- Enter a strong password in the Password and Confirm password fields. You can also use the Generate button in the Password suggestion row to generate a strong password.
- In the ‘Mailbox size’ field, specify the maximum size of the mailbox (for example, 1 GiB). This does not reserve space in advance: emails are stored in the plan’s shared storage.
- Only enable the ‘Catch-all’ option if you wish to receive all emails sent to non-existent addresses on the domain in this mailbox. This may result in a large amount of spam; for further details, see the article on catch-all email addresses.
- Click the Save button.
Alias addresses
On the Alias addresses tab, you can assign additional addresses to your mailbox (using the Add alias address button). Emails sent to an alias are delivered to the same mailbox, without requiring a separate password or storage. For example, emails sent to kapcsolat@ and ajanlat@ can both be delivered to the same mailbox.
Setting up forwarding
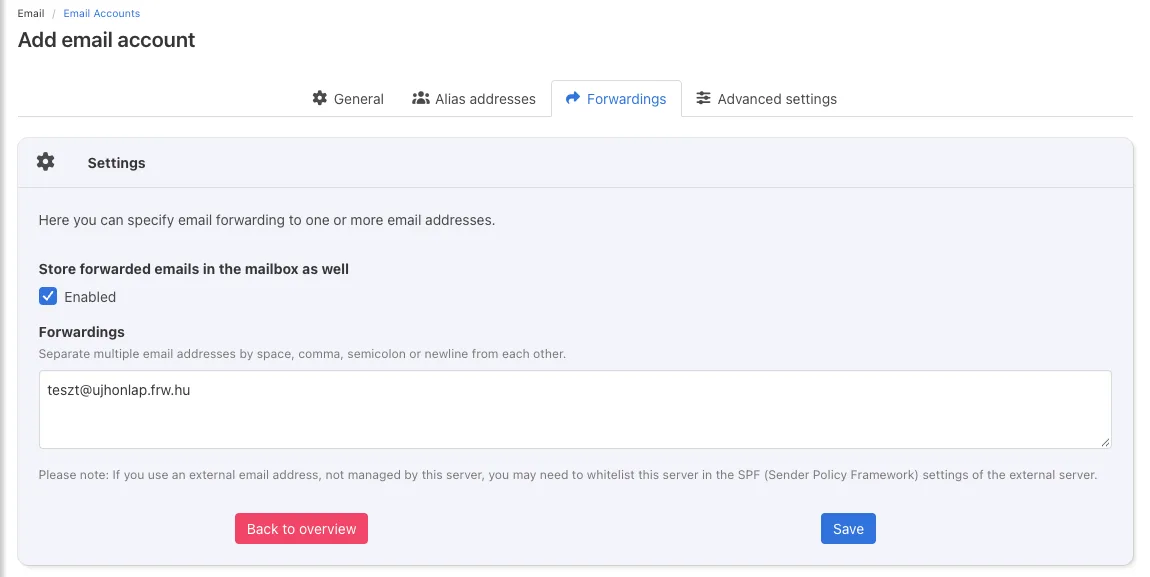
On the Forwardings tab, you can specify the addresses to which the server should forward emails received in the mailbox:
- Enter the destination address in the Forwardings field. You can separate multiple addresses using spaces, commas, semicolons or new lines.
- If you tick the Enabled option under Store forwarded emails in the mailbox as well, the email will also be kept in your mailbox; if not, it will only be delivered to the destination address.
- Click the Save button.
If you forward emails to an address hosted by a third-party provider (such as Gmail), the destination provider may apply stricter filtering to the forwarded emails; our article on forwarding explains the background and potential pitfalls. Do not set up two addresses to forward to each other, as this will result in emails going round in circles.
Spam filtering and other settings
On the Advanced settings tab, spam and virus scanning of incoming emails is enabled by default, and unwanted emails are moved to the Spam folder in your mailbox. Here you can set custom spam scores, block and allow lists (for addresses or domains), and specify that emails older than a given number of days in the Spam and Trash folders should be deleted automatically.
List of created addresses
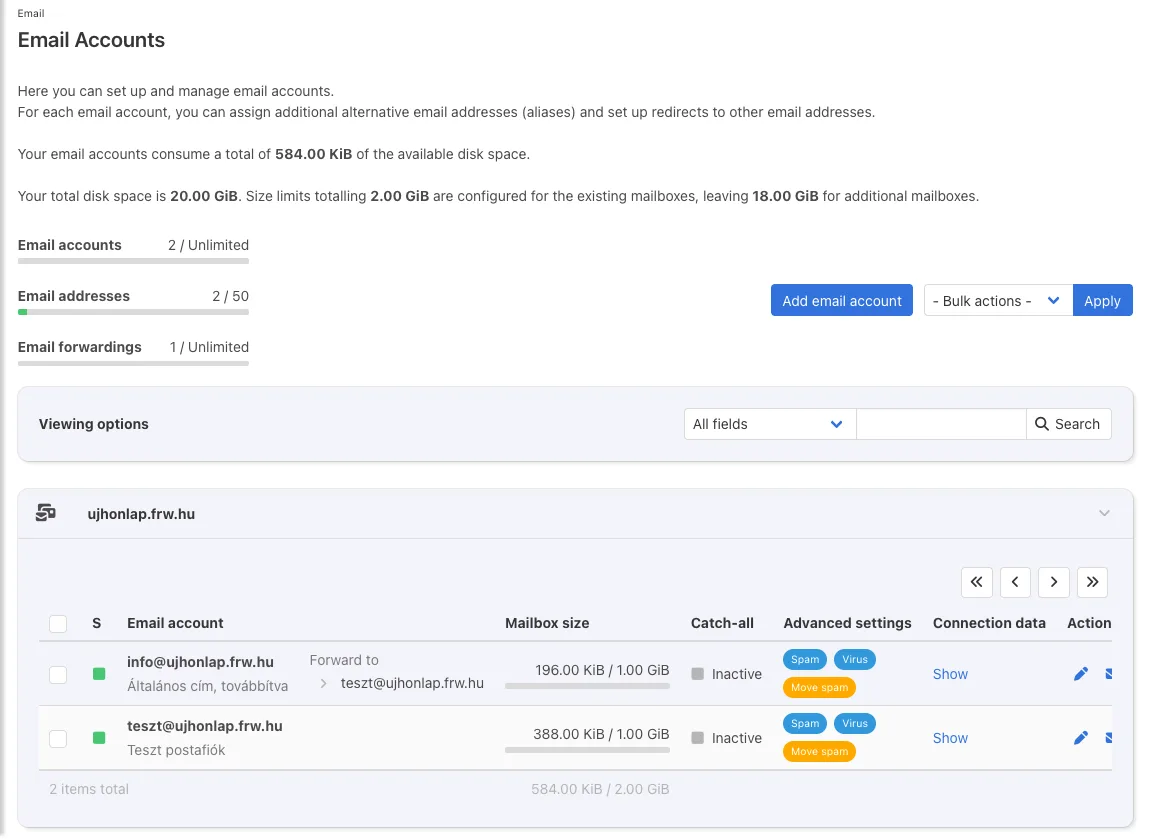
On the Email Accounts page, you can see the addresses by domain: the size and usage of each mailbox, the forwarding destination, the catch-all status and the protection settings that are enabled. At the top of the page, you can also see how much storage is left for new mailboxes. Later, you can change the settings or the password with the pencil icon in the Actions column at the end of the row (this opens the Edit email account page); on a narrower screen, you need to scroll the table to the right to see it.
Setting up an email client
The Show link in the Connection data column displays the information required for your email client:
- Server: the name of the hosting provider’s server, or alternatively, your own domain;
- Username: your full email address;
- SSL/TLS ports: IMAP 993, POP3 995, SMTP 465;
- STARTTLS ports: IMAP 143, POP3 110, SMTP 587 (or 25).
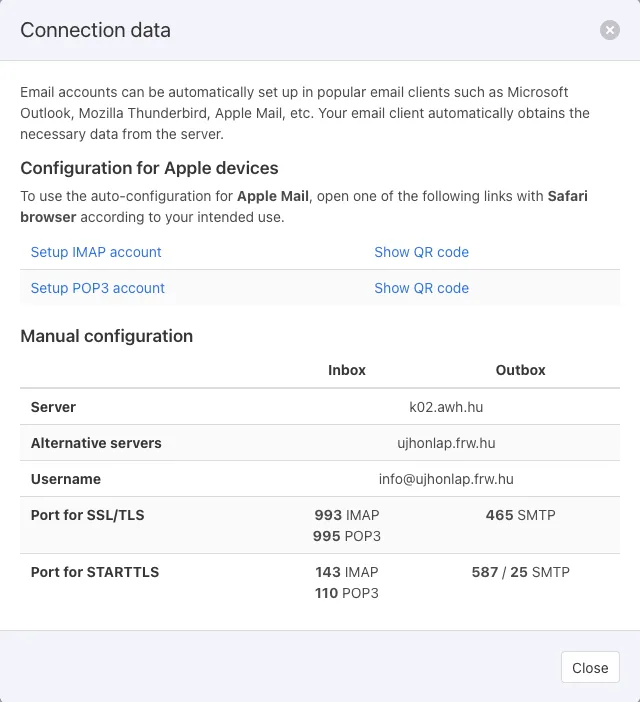
On Apple devices (iPhone, iPad, Mac), you can also set up the account automatically from the Safari browser with the Setup IMAP account link or the QR code. We have guides for other programs such as Outlook, Thunderbird and Android; our article on choosing between POP3 and IMAP will help you decide whether to use IMAP or POP3. You can also read your emails in the browser via the Webmail menu item of the control panel.
